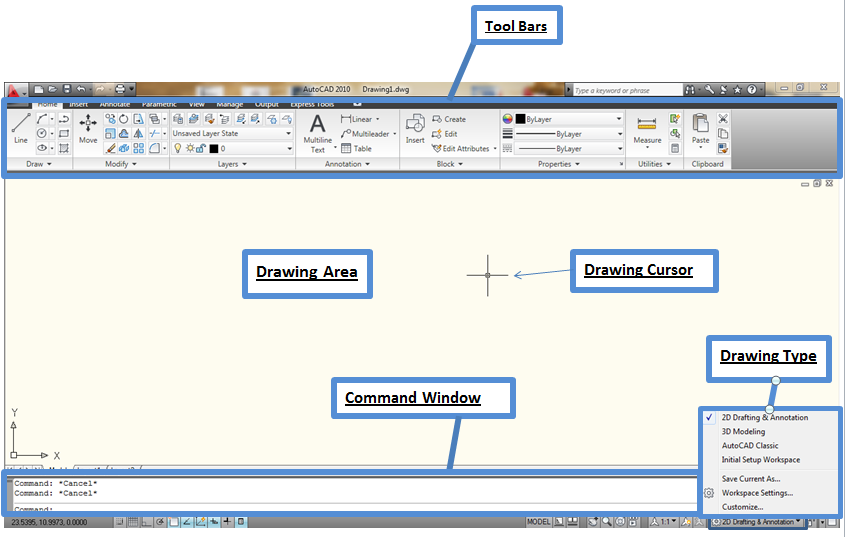
I have put together a few important points to use as a reference when first using AutoCAD. Throughout the tutorial I will provide more detail:. use scroll wheel to zoom in or out of the model or press and drag the scroll wheel to move around the model. use the view cube to change the direction of the view. click on faces, edges or corners to jump to different views. click and drag the view cube to create custom views. change between visual styles (solid, line drawing) with the visual styles controls.
use wireframe to draw most of the time, and realistic or conceptual to preview what it will look like in real life. to find a command or tool just type the first few letters of the command's title and then select it from the drop down menu that will appear. If it is at the top of the menu you can just press enter. important shortcuts:. ctrl + z = undo. esc = cancel.
enter = accept. press esc before you press undo because you can't undo while using a tool. TIP: after some commands some of the lines you have drawn seem to disappear. If this happens just use the mouse's scroll wheel to move the view a little and the lines should reappear.
Firstly, start a new document in AutoCAD:. press the plus (+) icon beside any open tabs or press ctrl + N. choose acad.dwt as the template, and open it. press ctrl + S to save the document Now we need to choose which work space to work in: We are drawing a 3D object so we will use the 3D modeling workspace.
in the very top bar, next to the save/print icons, press the drop down menu and select 3D modeling. Choose what visual style to use To choose how AutoCAD displays your model (solid, line drawing) choose from the visual styles menu. Change the visual style to wireframe We need to choose what view we will start with: We can see the front, left and top sides of the object we have chosen to model, so we should choose a view with these three sides visible. we can do this by going to the view cube and clicking the corner between front, left and top or we can use the view controls menu (beside the visual styles controls menu) and change it to SW isometric. if you just see a square that says TOP just click one of its corners and you will see a cube.
I like to work with the picture of the object we are modeling open, so I split my screen between AutoCAD and the picture. I recommend saving the image and doing the same while you work. Now we are ready to start drawing! First, draw the cross section of the center rectangle. It needs to be rectangle 60x70 units.
To do this:. type REC. select rectangle by clicking on it in the menu, or just press enter. type 0,0,0 to set the start point to the origin. press enter.
press D to set the dimensions. press enter. choose the length of the rectangle – type 70.
enter. choose the width of the rectangle – type 60. enter. click so the rectangle is formed in the SE corner – see picture Extrude the rectangle up 20 units.
type PRES. select presspull tool by pressing enter.

select the rectangle by clicking inside the rectangle. It is important that you click inside the rectangle, not on one of its sides as this insures you extrude the face, not just the edges. press enter. choose the height that you wish to extrude – type 20. press enter. Extrude the back rectangular prism.
Copy the upper Eastern edge. select copy edges tool from the solid editing panel. It is in the top right hand corner of the panel and may be hidden under the extract edges command. choose the upper Eastern edge of the rectangular prism you have just created and click it – see picture. press enter to confirm the selection. select the southern end of the line you just clicked to – click when you can see the blue square.
move the mouse along the negative X axis (the way you are going to paste the copy of the line). You can tell you are along the X axis if you see a thin green line. type 10.
press enter to confirm the copy. press esc to exit the copy edges tool. Extrude the new area 50 units up. select presspull tool (extrude won't work) – type PRES. press enter to select the tool. click inside the new face. drag up along Z axis.
type 50. press enter to confirm the extrusion. press esc to exit the presspull tool. Create the big cylinder at the top of the part:. Copy an edge to use as guide – see pic. change UCS (universal coordinate system) to Left.
This will allow us to easily draw objects orientated to this plane. To do this:.
Quickbooks 2014 Guide
select the view tab at the top of the screen. inside the coordinates panel, click on the drop down menu where it says world and change it to left. copy edge with the copy edges tool just like you did before. Copy it in 30 units. Draw the cylinder. We will draw two cylinders and join them, as this is the easiest way of doing it. One cylinder will go towards the left, and the other one will go towards the right, they will both start at the same place where the guide meets the top side of the rectangular prism.
When we have drawn them both we will join them with the union tool. Draw the left cylinder:. type CYL. press enter to select the cylinder tool.
choose the center of the cylinders first face. Click where the new guide line and the top line meet.
You will see a green square. move mouse along X axis and click at the end of the rectangular prism to set the radius.

You should see a blue square. Set the depth of the cylinder. Type 25. press enter to confirm cylinder. Draw the right cylinder:.
again, click where the new guide line and the top line meet. You will see a green square. move mouse along X axis and click at the end to set the radius. You should see a blue square. Set the depth of the cylinder.
As we want the cylinder to extrude to the right, and we are in the left UCS we must use a negative number. Type -15. press enter to confirm cylinder. join the two cylinders together. type UNION. press enter to select the union tool. select both cylinders.
You can do this by clicking one cylinder and then the other, or draging around both. press enter to merge both cylinders into one. Select the guide line and press delete as we don't need it anymore. Temporarily change view to realistic to see how the project is coming along. Change the view back to wireframe. Make the bore hole on the left side.
draw a circle. Type CIR.
press enter to select the circle tool. select the center of the circle. Use the center of the cylinders end face and click. You should see a small green circle. type the radius of circle. On the view cube, select the corner between left, front and bottom and change the UCS to bottom.
Change the visual style to hidden. You don't have to do this but I find it makes it easier to work as you don't get muddled by all the lines in the top part of the object. Extrude the main bottom rectangular prism.
The next part is hard to explain so please use the screen shots to help you work out what I am trying to say. 3D printers use STL (STereoLithography) files. Read more on Wikipedia. To export a STL for 3D printing:. Go to the output tab. click send to 3D print service. drag around the whole object.

press enter to export the selection. set the scale (usually just leave all the defaults and press OK). choose where to save the STL file. now you can send the STL file to a 3D printing company or import it into the software that you use with you 3D printer You can also import you STL into blender to animate it.
all parts that you want to animate separately must be separate. just export STL files in the same way as above and you can import them into blender by going file - import - STL.